Welding Defects
I was editing Garrett’s article on the purge welding process a few days ago. In that article he talks about a type of defect in stainless TIG work called “sugaring” and I started wondering how many different types of defects there are. What do they look like and why are they considered defective (beyond, of course, being an incomplete weld)?
Turns out the answer to the last question is pretty easy. Defective welds are so because they do not form a complete joint between two pieces of metal. Any holes, cracks, inclusions, porosity, etc make the weld more prone to failure.
There are a couple of ways to see a weld failure, and one of them is purely by sight. Porosity, cracks, spatter, and discoloration is all easily noticed when only a single pass is made.
When multiple passes are made (for thicker material) one can either cut the weld and inspect it for defects or through NDT (Non-Destructive Testing). Obviously, cutting the weld down the middle is essentially useless if you’d like the weld to continue existing for its intended purpose. Typically, cutting a weld for inspection is only done for weld tests, qualifications, and certifications. There are a few different variations of NDT, but that’s a topic for another article.
So, let’s get into defects, and what they mean. I won’t be covering every type of defect in this article, only (arguably) the most common ten.
Inclusion
Mechanical Damage
Lack of Fusion
Poor Penetration
Porosity
Roll-Over/Overlap
Undercut
Spatter
Burn-Through
Underfill

Inclusion
Inclusions are when contaminates are trapped inside a weld. Impurities in a weld can significantly reduce the structural integrity of a weld. Typically this impurity is slag and it gets trapped in the weld when the weld cools too quickly, and the slag is not allowed to rise to the top of the puddle. Anyone familiar with welding will think of stick welding when they hear slag, but inclusion defects can happen in the MIG and TIG processes as well, inclusions in those cases being rust, or tungsten for example.

Mechanical Damage
This is exactly what it sounds like, the damage produced by post weld finishing like a chipping hammer, or a grinder. Finishing techniques that are too aggressive, or incorrect can damage a weld’s structural integrity. This is pretty straightforward but can be an easy thing to overlook when you’re in a rush or aren’t familiar with the tools or techniques.

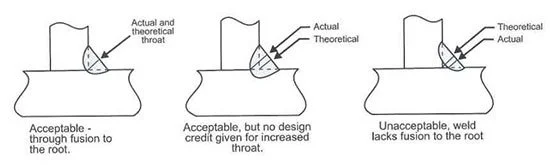
Lack of Fusion
This is typically only problematic during multiple passes. A lack of fusion is essentially a void where the filler metal was not bonded to the material. It should go without saying that if there are holes or gaps in the weld it will not be structurally sound.
Poor Penetration
One could easily argue that poor penetration is just a very specific way to say “Lack of Fusion” in a specific spot. I think that would be technically correct, but I’ve listed them separately since not all “Lack of Fusions” are “Poor Penetrations” but all “Poor Penetrations” are “Lack of Fusions” Poor Penetration is also called “incomplete penetration” it just means that in a butt joint (where two pieces of metal are butted up against one another) the weld didn’t fuse all the way to the bottom on the first pass.

Porosity
This is a particularly egregious example of porosity. Still, I’m going to let the experts at thefabricator.com say it better than I ever could: “Porosity is weld metal contamination in the form of trapped gas. Shielding gases or gases released as a result of the torch being applied to treated metal are absorbed into the molten metal and released as solidification takes place. In other instances, the shielding gas doesn’t completely reach the weld pool and the atmospheric air adversely affects the weld bead.” So basically, shielding gasses from the welding process are trapped in the metal, or external air/gasses are introduced into the metal. There are acceptable levels of porosity in some welding processes, but in others, it would cause a weld to be considered a failure. This could be something as simple as running out of shielding gas or having the wind blowing through your welding space.

Roll-Over/Overlap
Overlap or Roll-Over is a problem mainly in butt welds and fillet welds. It is classified as a “bulge of metal beyond the root, a protrusion that occurs beyond the weld toe.” Preventing this comes down to having the right technique, and materials. Don’t oversize your electrode for the material you’re welding, keep your torch angle good, avoid setting your amperage too high, and keep your travel speed consistent for the amperage.

Undercut
When areas of the weld are less than or more shallow than the original base material, this is called Undercut. The loss of material or thickness between the two metals being joined puts additional fatigue on the rest of the weld and increases the risk of weld failure. The solution to undercut is, unfortunately, the solution to many of the defects on this list: proper technique, proper materials, and proper amperage. Sorry, y’all. It’s gonna take a bit of tinkering.

Spatter
Although spatter is primarily an aesthetic issue, it can (occasionally) be indicative of some larger problems. For example, if you’re getting spatter because the base metal is unclean, you’re running the machine too hot, or because your arc length is too long, these are all symptoms of some other types of weld failure. Keeping all of these things in check will not only reduce your spatter but will ensure that larger, more serious problems do not arise in your weld.

Burn-Through
“A localized collapse of the weld pool due to excessive penetration” also known as ‘you blew a dang hole in it’. Caused by slow travel speed, trying to weld too large of a gap, or having your amperage set too high for the thickness of the material you are trying to weld. I think it goes without saying why this is considered a welding defect.

Underfill
Underfill is distinctly different from undercut. Undercut welds have a distinctly convex shape where the peak rises above the base material, while underfilled welds at no point reach the surface of the base metal. This leaves the weld looking like a rut between the two base metals, which weakens the joint. Keep an eye on your current, and travel speed and this will be an easy one to avoid.
Hopefully, if not helpful, this article at least satiated your curiosity.
Not to put too fine a point on it, but a common link between all of these weld failures are: travel speed, making sure your machine is running at the correct amperage for whatever you’re working on, and whatever process you are using, and well as ensuring you have a good fit up. Go slow for a few, take your time, and ensure (if possible) you’re in an environment conducive to the type of welding you need to do.
P.S. I used a photo of a plasma cutter for the icon of the article because I think I am quite funny, thank you.
Sources:
https://weldguru.com/common-welding-defects/
https://learnweldinginspector.blogspot.com/
https://www.lincolnelectric.com/
https://blog.blackadvtech.com/overlap-welding-what-is-it
https://uploads.tapatalk-cdn.com/20170117/0bf1f7321e5b914c42bcfbd6dcacdf4d.jpg
https://www.slideshare.net/ThangDoMinh/wis5-welding-defects-02
http://forum.weldingtipsandtricks.com/viewtopic.php?f=4&start=10&t=6209